
Dentistry is a field that is mostly governed by accuracy and precision. As dentists, you wouldn’t want to drill just around or near the vicinity of the cavity; you want to drill the cavity at precisely the exact point it needs to be drilled, following dental principles, which pretty much calls for accuracy and precision. But doing something accurately and precisely is a challenge in and of itself. Imagine doing it on a surface where your thumb is actually bigger than the surface you are working on. Hard to imagine and even harder to do, but the introduction of magnification or loupes in our field has made this challenge easier to deal with. That’s why dental loupes in dentistry have gained a lot of popularity from the time it was introduced. Even more so now that it has become a valuable tool, something some dentists and even dental trainees/ students have come to rely on heavily frequently. And without a doubt, dental loupes for students and dentists play a significant role for bench test preparation.
Loupes are simple, small magnification devices used to see small details more closely. Unlike dental magnifying glasses, they do not have handles, and their focusing lenses are contained in opaque cylinders or cones or fold into enclosed housings that protect the lenses when not in use.
Types of Dental Loupes
Types of Dental Loupes According to Lens System (Prismatic vs Galilean Loupes)
– Galilean Loupes
This is the more common system and is also known as lower magnification loupes. The practical range is limited to x3.5 or less, as the system is limited by spherical aberration. The field’s flatness from top to bottom and left to the right begins to distort the image quality as magnification increases. An additional consideration is that all Galilean lens systems produce a halo effect at the periphery of the visual field, which, in some cases, maybe bothersome. They are, however, relatively light in weight and low cost. And recent developments in optical technology have led to the manufacture of Galilean loupes with improved optical quality. This may mean that the heavier Prismatic loupes will become outmoded, even for greater magnification.
– Prismatic Loupes
These provide the highest optical quality available today. In Prismatic loupes, the passage of light is lengthened through a series of internal reflections via a Schmidt prism, thus allowing the barrel of the loupe to be shortened sufficiently for spectacle or headband mounting. These loupes provide improved quality of magnification, wider fields of view, and greater depth of field. The disadvantages are that they are heavier, have long barrels, and are more costly. They can be used for all levels of magnification as dental loupes and of course as dental loupes for students.
The positioning of the Optics
– TTL or Through the Lens Loupes
TTL loupes have the optics built into the glasses, with the specifications (such as inter-pupillary distance) customized to your eyes. Because of this, a detailed examination and fitting are required for these types of loupes.
Advantages of Through the Lens Loupes (TTL):
- Lighter weight
- Wider field of view (as optics are closer to the eyes)
- Optics will always be in the right position
Disadvantages of Through the Lens Loupes (TTL):
- Much more expensive
- Much more difficult to communicate with the patient as they cannot be flipped out of the way
- Poor resale value (as they are only suited for the person they are set to)
– Flip-Up Loupes
Flip-up loupes have the optics attached to a moveable arm and can be manually adjusted to suit anyone.
Advantages of Flip-Up Loupes:
- Much cheaper and a good choice as dental loupes for students
- Better for communicating with patients as they are easily flipped when not required
- Better resale value
- Easier to add a prescription
Disadvantages of Flip-Up Loupes:
- Heavier
- A smaller field of view

WHY DO WE USE LOUPES?
There are 3 principal reasons for adopting a Loupe in dentistry (1):
– To Enhance Visualization of a Fine Detail.
There is no doubt that magnification is becoming more popular as clinical techniques become increasingly demanding. This magnification allows you to see critical details more clearly than normal viewing won’t permit.
– To Compensate the Loss of Near Vision (Presbyopia).
Studies show that the dental loupes working distance significantly increases as we age and by using loupes. However, the dental loupes working distance can be kept at a comfortable constant, ensuring upright posture throughout the dental practitioner’s working life.
– To Ensure Maintenance of Correct Posture.
Correct operating posture becomes doubly important for the dentist who uses magnification. Maintenance of the transverse axis of the eye in the horizontal plane is essential to avoid disorientation. There is plentiful evidence to support that the use of appropriate loupes diminishes and, in some cases, eliminates chronic neck and back pain. These studies have demonstrated that appropriate selection, adjustment, and magnification systems facilitate adopting a more upright posture.
HOW TO CHOOSE THE BEST DENTAL LOUPES:
Choosing dental loupes in general and specially finding the best dental loupes for students can be confusing and complex if you don’t know what to focus on before delving into other things like brands and other stuff. To make it simpler and less confusing, here are several steps that you can follow:
– Dental Loupes Working Distance
Dental loupes working distance is the distance at which a loupe will focus. You need to carefully select your working distance because an appropriate one will help you maintain the correct posture throughout your procedure. To measure the working distance, sit in an ergonomic position as if you were working on a patient, and take a tape measure and measure the distance between the bridge of your nose and the area of the patient you would be working on (2).
See the video below showing how to measure the working distance:
Usually, your working distance will be close to what is shown in the table below (3)
- Height: <5’7″ (170cm)
WD(sitting): 34cm (14″)
WD (standing): 42cm (16″) - Height: 5’7″-6’4″ (170-193cm)
WD(sitting): 42cm (16″)
WD (standing): 50cm (20″) - Height >6’4″(193cm)
WD(sitting): 50cm (20″)
WD (standing): 55cm (22″)
– Depth of Field
After getting your working distance to understand loupes better, there are certain concepts you need to know. The first concept is the depth of field. The depth of field refers to the ability of the lens system to focus on both near and far objects without having to change position. It determines how much you can lean into and away from an object. Loupes are made to stay in focus at specific working distances. However, this distance is actually a range. So, if a loupe has a working distance of 18 inches and has a depth of field of 5.5 inches, it means the loupe will remain in focus from a distance of 15.25 inches to 20.75 inches, or 2.75 inches on either side of the working distance.
– Field of View
The next concept you need to understand is what field of view is. The field of view is everything visible at once when looking through the lenses of the loupes. Several factors can affect the field of view. They are:
– Distance from the Lens
the closer your eye is to the lens, the larger the field of view will be and vice versa.
– Magnification
the higher the magnification, the smaller the field of view will be and vice versa.
Dental Loupes
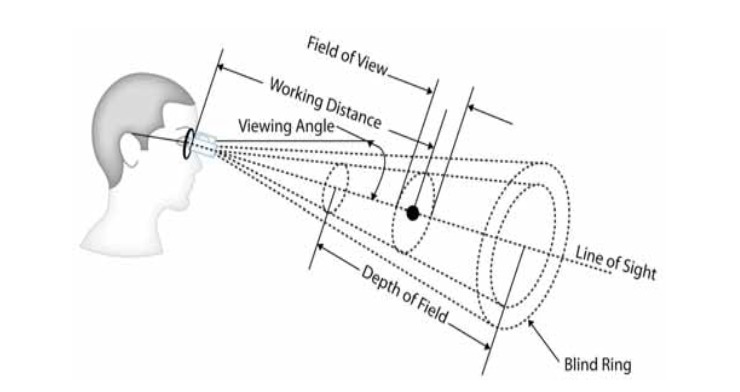
– Declination or Viewing Angle
Another concept to take note of is the declination or viewing angle. This is the angle at which a lens is set to a horizontal reference line drawn from the superior auricular crevice to the nose’s bridge and will determine the sightline. When operating, the greater the angle concerning this line, the greater the neck tilt necessary to view the object. It is ergonomically important to ensure that this angle is correct for the individual to minimize strain on the neck, back, and shoulders.
Here is a diagram showing these concepts to understand them better:
– Choose Your Magnification.
The amount of magnification determines the size of the image viewed through the loupe. It would be best if you determined on your own what magnification you most feel comfortable with and allows you to work more effectively. For dentistry, the most common is x2.5 magnification and x3.5 magnification. The table below further explains these two magnifications.
Magnification X 2.5
- wider field of view can see multiple quadrants
- greater depth of field
- Image not as magnified/large
- A lot of people like the vendor representatives and some schools (like Buffalo University for pre-clinic) suggests/requires to start with this magnification if you are a beginner because higher magnification at the start can sometimes get a bit disorienting or confusing, and for some people, a kind-of-motion-sickness sensation is experienced that a period of adjustment on this magnification is suggested before trying out for higher magnification
- These dental loupes can be used for general dental procedures like operative and fixed procedures.
Magnification X 3.5 or Higher Magnifications
- The narrower field of view restricted to a single quadrant– Although nowadays, some brands offer the x3.5 magnification but with an EXPANDED FIELD to compensate for this, so it does not become much of a disadvantage
- smaller depth of field
- Image is larger
- Some people suggest starting with this magnification for dental loupes for students and trainees instead of starting with x2.5 then buying another pair when you reach D3 or D4. (if you’re looking to save a bit of money). Especially when you don’t feel the motion like sickness sensation that other people have experienced and can use this magnification without any problem
- For some new users, there is a steeper learning curve.
- Used for procedures that require more detail like endodontics
- Darker field of view as there is a decrease in the amount of light coming through the lens as magnification becomes higher
– Test and Write
When comparing different dentistry loupes, test and check everything from your working distance, the field of view, depth of field, declination angle, and magnification note what you liked and what felt most comfortable, and what will prove to be the most effective when you’re working.
– Check
Using the loupe that you chose, look at the testing objects and select an area of tiny details that can only be seen with magnification. Also, check for the most common signs of poor-quality loupes like low resolution, chromatic aberration, and spherical aberration.
Resolution
Resolution is defined as an optical system’s ability to form distinguishable objects separated by small distances or recognize fine detail. This refers to the clarity of the image, which is determined by the quality of the optics. The better the optics, the better the resolution. But this varies from brand to brand or type to the type of loupes. So, the best way to determine which one is right for you is trying them on and seeing for yourself the clarity of the image in focus.
Chromatic Aberration
Chromatic Aberration refers to color distortion. Because each color has a different wavelength, uncorrected optics causes the various wavelengths to focus at different points in space. The first color that generally comes out of focus is blue; when looking at black lines on white paper, poor quality loupes will display a blue haze just to the black lines’ side.
Spherical Aberration
Spherical aberration refers to the flatness of the image. When viewed through loupes, an object that exhibits spherical aberrations would appear to be curved or spherical. The lines would not be straight.
Viewing Colorful or Complex Objects
Viewing colorful or complex objects such as anatomical models or inside your hand does not allow you to evaluate loupes for their true optical performance. Most people are not trained to see the differences in such complex images. However, a simple piece of graph paper can reveal the difference between mediocre and high-quality loupes.
Important Considerations for Finding the Best Dental Loupes
Here is where it gets a little bit complicated as this is the time to consider other factors.
-
Comfort, Fit, and Weight of the Loupe
remember that you will be wearing that loupe almost all day, every day! You’ll be wearing that loupe for long periods of time. For some, not noticing or being bothered by the weight is a big factor in choosing their loupes. Find loupes that are lightweight, comfortable, and fit you.
-
If You Use Glasses
If you use glasses with prescription lenses, you must choose to fit your loupes frames with the correct prescription. Otherwise, the loupes will not perform according to specifications. The standard frames can easily be fitted with prescription lenses by your optician. Loupes are also available in a “clip-on” option, which can be clipped onto your regular glasses.
-
Interpupillary Distance / Pupillary Distance
The distance between the pupils of your two eyes is your interpupillary distance. For the sake of comfort when focusing, your loupes must fit your eyes. Your optometrist can give you an exact measurement. It is best to get a loupe that is adjustable so that you can set your loupes to an interpupillary distance that suits you.
More tips on How to measure PD in the video.
-
Light Source
Make sure that you can add a light source to it. According to a study, visual acuity significantly improves when using magnification with a fiber-optic light source. Light intensity loupe of up to 30,000 lux is regarded as safe whilst minimizing glare. Much brighter LED lights are available, but they produce more glare, as the light is reflected from the surfaces of the teeth and may not be safe for prolonged use. In addition to this, if loupe users do not have additional LED lighting, their pupils will dilate, reducing field depth. LED lighting is mandatory with higher magnification, and many experts consider it essential with any magnification. LUMADENT is an example of a light source preferred by many because it’s decently priced. It performs well, and the battery lasts longer than some. The company even offers group discounts for students looking to buy them.
-
Frame Styles
Many choose from, ranging from lightweight to ultra-lightweight, from legend or iconic frames to sports frames. You can find one that suits your budget and preference.
-
Price
Dental Loupes are available from $50 – $2000 and above. Believe it or not, some people use $50 dentist loupes and are happy with it; they find little difference with what they can clearly see with it compared to their best dental loupes costing $1600. But of course, some people would opt for the expensive ones, as they feel it would be more reliable and durable. You get what you pay for is what they say. But again, with a lot to choose from, you can always find what suits your budget. Buying cheaper dental loupes for students makes more sense in my point of view if you are a dental student.
-
Brands
This is another factor that some people take into consideration. Here are some brands I haven’t really tried but I have heard good things about them the best dental loupes:
-
- Orascoptic – great optics not as expensive as the ones with the same quality optics.
- Q-Optics – most expensive but comes with a lifetime warranty, lightweight.
- Designs for Vision (DFV) – durable
- Surgitel
- EyeMag Pro (Zeiss)
And last but not least, those dental loupes available on eBay and Amazon for under $100 and above.
The term “to each his own or personal preference” is definitely one of the things to remember when choosing dental loupes. As you do your research may be online, you will find that it’s a daunting task that can sometimes become increasingly confusing as you go and research some more. As a student you will have a wide variety of choices to buy a good dental loupes for students. Many people have different opinions about certain types or brands, but these are only based on their own experiences, which would definitely vary from person to person. What may work for others may not work for you. In conclusion, don’t be afraid to try out the dental loupes, test, and check everything that needs to be tested. Hopefully, this would help you in choosing the right dental loupes for you. Happy hunting!
Related Articles:
Citations:
- Magnifying Loupes In Modern Dental Practice: An Update by Teresa James et al
- The How To’s of Selecting Dental Loupes post by Stephen on Universal Medical site
- Surgical Loupes Defining Differences post on World Precision Instruments site
Leave A Comment